How to write in cursive: a step-by-step plan for kids
To write in cursive, learn the lowercase letters in families that start with the same stroke, not from a to z. Every cursive letter is built from four strokes: undercurve, downcurve, overcurve and slant. Tilt the paper, keep the pencil on the page through each word, and dot the i's and cross the t's only after the word is done.
Cursive looks like 26 new letters with 26 new shapes. It isn't. Zaner-Bloser, the handwriting program used in a lot of US schools, builds every cursive letter and numeral for grades 2 to 5 out of four strokes. Learn those four, then learn the letters in the groups that share a starting stroke, and most of the alphabet falls into place.
A lot of parents end up teaching this at the kitchen table, because plenty of schools stopped. Cursive came back into law slowly: 14 US states required it in 2016, and 25 did by July 2025, according to a FOX Television Stations roundup of state laws. If your child's school is in the other half, the plan below is the one the school programs use, cut down to what you need at home.
What are the four basic strokes of cursive?
The four strokes are the undercurve, the downcurve, the overcurve and the slant. Zaner-Bloser teaches them before any letter, because each lowercase letter opens with one of them. A child who can make the four strokes smoothly on lined paper already knows the first move of every letter in the alphabet.
Here's what each one looks like, described in Zaner-Bloser's terms:
- Undercurve: start on the baseline and curve under and up to the middle line. It's the shape of a shallow smile with a long right side.
- Downcurve: start at the middle line and curve left and down to the baseline. It's the start of a c.
- Overcurve: start on the baseline and curve up and over to the right, like the top of a hill. It's how n and m begin.
- Slant: a straight line pulled down from the middle line to the baseline, leaning to the right.
Have your child fill one row of each on three-line paper before you show them a single letter. It looks like scribbling. It's the warm-up the whole year rests on.
What order should you learn cursive letters in?
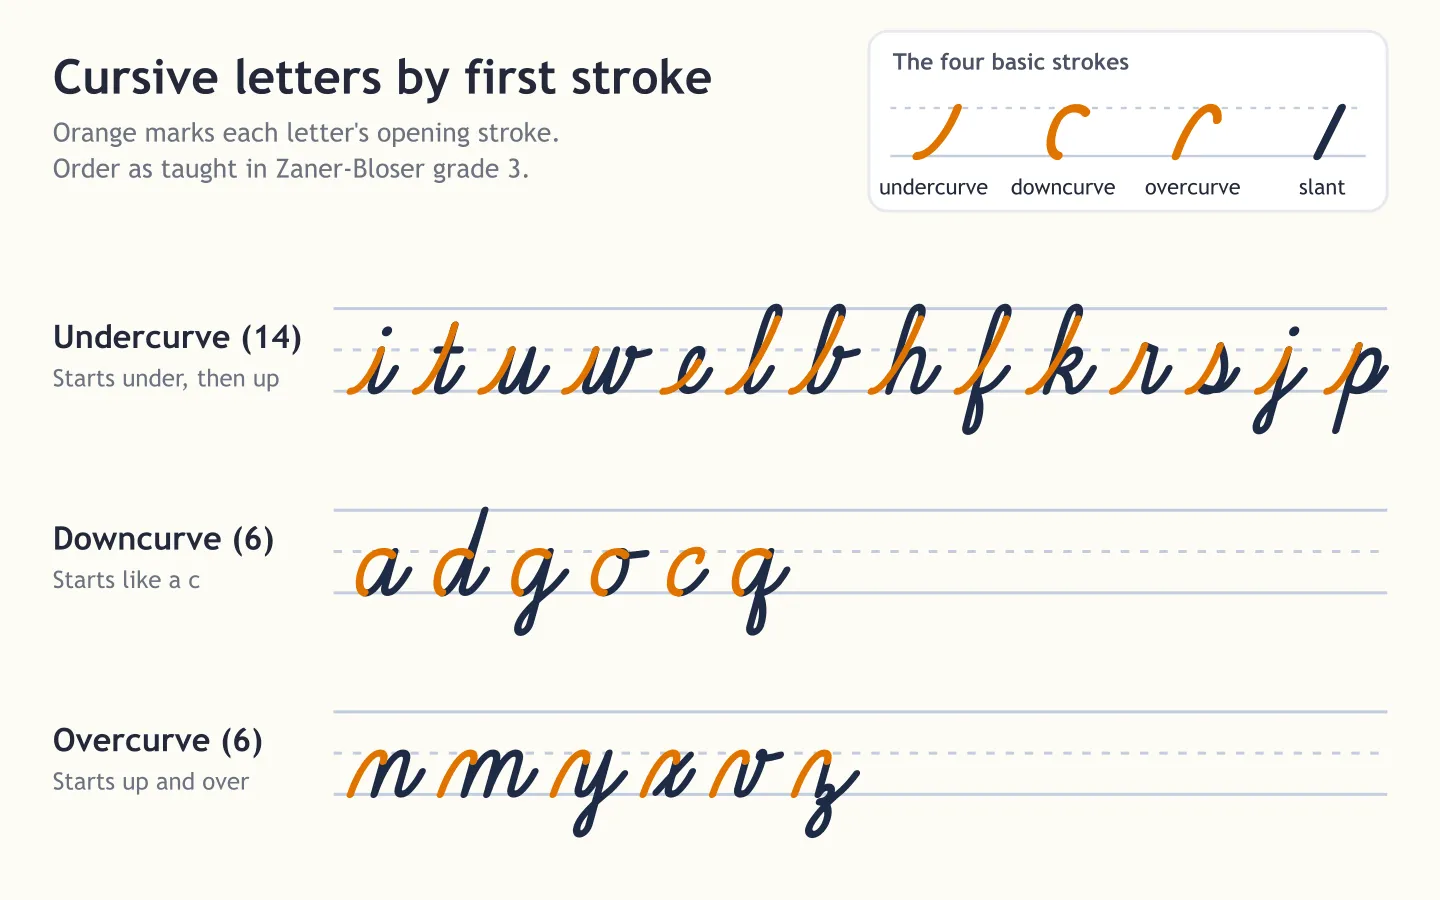
Learn the lowercase letters in stroke families, then the capitals. Zaner-Bloser's third-grade book teaches 14 undercurve letters first, then 6 downcurve letters, then 6 overcurve letters. Letters in a family start the same way, so each new one only adds a small change to a move the hand already knows.
The exact sequence from the Zaner-Bloser grade 3 student book:
- Undercurve letters: i, t, u, w, e, l, b, h, f, k, r, s, j, p
- Downcurve letters: a, d, g, o, c, q
- Overcurve letters: n, m, y, x, v, z
Pediatric occupational therapist Colleen Beck, who runs The OT Toolbox, suggests a different starting point. She opens with c, a, d, g and q, because those cursive letters look almost the same as their printed versions, so a child gets early wins. Then she moves through i, t, p, u, w and j, then the loop letters e, l, f and h, and saves m, n, y, x and z for later.
The two plans disagree on which family goes first. They agree on everything else: group by stroke, lowercase before capitals, and never a to z. If your child's school uses one program, follow its order so the letters match what the teacher expects. If not, pick either and stick with it.
How do you set up the paper and pencil?
Tilt the paper, not the child. For a right-handed writer, Beck places the sheet a little left of center and turns it so the bottom left corner points toward the child's left armpit. A left-handed writer does the mirror image: paper right of center, bottom right corner toward the right armpit.
That tilt is where the slant comes from. Zaner-Bloser's practice pages tell students to position the paper correctly so their undercurve letters will have good slant. If every letter in your child's cursive stands bolt upright or leans backward, check the paper before you correct the letters.
A few more setup details from Beck. Feet flat, knees and hips at roughly right angles, elbows about level with the desk. And a sloped surface helps: a wide three-ring binder turned sideways makes a free writing slope that tips the wrist back into a better position. The pencil grip doesn't change from print. Whatever grip your child uses for printing is the one to keep.
Left-handed kids have a few extra tricks for cursive, about seeing the model letter and not smudging, and our left-handed handwriting tips cover them.
How do you join cursive letters?
The ending stroke of one letter is the starting stroke of the next. That's the whole rule, and it's how Zaner-Bloser words it. Most lowercase letters finish with an undercurve that rises from the baseline, so that rising line keeps going and becomes the first stroke of the following letter.
Two habits make the joins neat:
- Swing wide. When a letter that ends in an undercurve joins a letter that starts with one, Zaner-Bloser tells kids to swing wide, so the letters don't crowd together. Kids who skip this get words like "see" looking like one squashed blob.
- Finish the word first, then dot and cross. Zaner-Bloser's instruction for i and t is to finish the joining before dotting the i or crossing the t. Stopping mid-word to dot breaks the flow, and the join after it usually comes out bent.
A handful of letters don't follow the baseline rule. The letters b, o, v and w end up at the middle line, so they join to the next letter with a small flat bridge instead of a rising stroke. They cause most broken joins, and our guide to hard words to write in cursive goes through them with the words that trip kids up.
How to practice cursive at home, step by step
Short and often wins here. Ten to fifteen minutes a day is plenty for most 7 and 8 year olds, and our guide on how long handwriting practice should be explains why: a tired hand rehearses sloppy joins. A plan that follows the school order:
- Warm up with one row each of the four strokes. Two minutes, no more.
- Teach two or three new letters from the current family. Trace each one first, then copy it from a model, then write it from memory with the model covered.
- Join only what you've learned. With the first undercurve letters you can already write it, tie, lift, wish, fish, spill, bike and puppet. Real words keep it from feeling like drills.
- Add the downcurve family and new words open up: dog, add, goat, cold, quiet.
- Finish the overcurve family, then start capitals. Several cursive capitals look nothing like their printed versions, so trace each one a few times before writing it from memory.
- Once a week, have your child write one sentence they choose, in cursive, without a model. That sentence tells you which letters need another round.
Talking helps more than you'd think. Have your child say the stroke while making it, like "undercurve, slant, undercurve" for the letter i. Saying it slows the hand down to a speed it can control.
Is my child ready for cursive?
Most children are ready around second grade, at 7 or 8 years old, which is when Beck says pencil control has usually developed enough for the fine, steady movements cursive asks for. Age matters less than three signs: they print every lowercase letter from memory, their printed letters sit on the line, and they can copy a row of loops without lifting the pencil.
If printing is still shaky, wait. Cursive adds a second job on top of letter shape, the join, and a child still working out where letters go will find that second job frustrating. Fix the print first and the cursive goes faster later.
The short version
Learn the four strokes. Learn the lowercase letters by family, undercurve first if you follow Zaner-Bloser or c, a, d, g first if you follow Beck. Tilt the paper, join by letting each letter's last stroke become the next one's first, and save the dots and crosses for the end of the word. The cursive worksheets on TraceTots print the whole alphabet on guided three-line rows, so you can trace a family today and write it from memory tomorrow.
Make a name tracing worksheet
Type a name, pick a font, and print a free tracing sheet to practise with.