Palmer Method handwriting: what it is and how to practice it
The Palmer Method is a plain, fast style of cursive that Austin Norman Palmer developed in Iowa in the 1880s. It was the most popular way American schools taught handwriting until the 1950s. Students rested the forearm on the desk, moved the pen with the arm instead of the fingers, and drilled rows of ovals and lines to a count before writing words.
In 1912 alone, the A. N. Palmer Company sold a million copies of its handwriting manual, according to the company's own 1937 history. In New York City, the method reached 285,605 pupils in its first four years. If a grandparent of yours went to an American school between the two world wars, the loops in their birthday cards may well have started as a page of Palmer ovals.
The method also has a weak spot, and a University of Chicago professor found it with a motion-picture camera in 1918. Below is what Palmer taught and what that study found, then the drills worth handing to a child who is learning cursive now.
What is the Palmer Method of handwriting?
The Palmer Method is a style of cursive and a way of teaching it, built for speed. Austin Norman Palmer called it rapid, plain, unshaded, muscular movement writing. Students drove the pen with the muscles of the arm and shoulder while the fingers stayed nearly still, and they drilled for weeks before writing whole words.
Palmer was a trained ornamental penman who took an office job with the Iowa Railroad Land Company in Cedar Rapids in 1880. According to penmanship historian Michael Sull, he noticed that the fastest clerks kept the forearm on the desk and barely moved their fingers, nothing like the flourished style he'd been taught. He copied them, and the method grew out of that. Palmer's Guide to Business Writing came out in 1894, and The Palmer Method of Business Writing, the manual most people mean today, in 1901.
He was pushing against Spencerian script, the shaded, slow style that ran American penmanship teaching after the Civil War. His break came at the 1904 World's Fair in St. Louis, where an associate superintendent of New York City's schools saw a Palmer exhibit. The city adopted it, and districts across the country followed.
It faded in the 1950s, once schools switched to teaching print first and cursive later. The company held on into the 1980s, and its 1984 Centennial Edition for fifth grade now sits in the University of South Carolina's rare books collection.
How is Palmer cursive different from what kids learn today?
The biggest differences are the order and the muscles. Palmer pupils learned cursive with no printing stage first and powered it from the arm. Today's US programs, such as Zaner-Bloser and D'Nealian, teach print first and add cursive around second or third grade, and neither opens with weeks of arm drills.
Here's how Palmer compares at the desk and on the page:
- Drills come first. Palmer told teachers that primary-grade pupils could spend three to six weeks on posture and arm movement before picking up a pen.
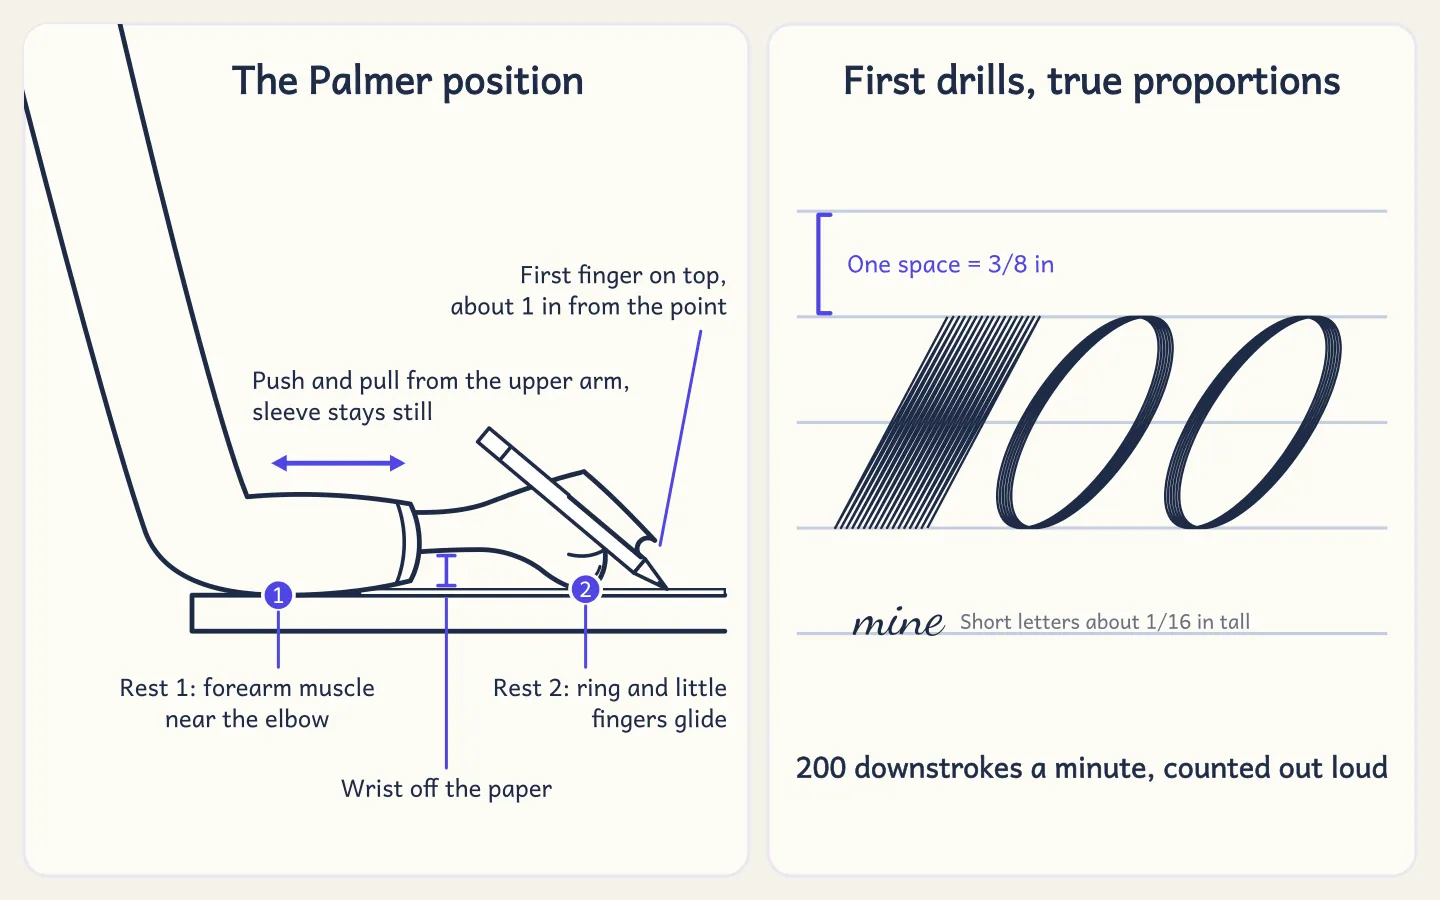
- The letters are tiny. In the 1915 manual, the short letters in a practice word like mine stand about 1/16 inch tall, around 1.6 mm. That's office writing, a fraction of the size a first grader prints on primary paper.
- Slant is personal. Palmer wrote that slant takes care of itself when the posture is right, and that each writer could settle on their own angle as long as it stayed the same from letter to letter.
- Speed is part of every lesson. Each drill has a target pace per minute, checked against a watch.
- Left-handers aren't in the book. Every instruction is written for the right arm. Donna Braden, a curator at The Henry Ford museum, notes that Palmer saw left-handedness as deviant and insisted that left-handed pupils write with the right hand.
How does Palmer's muscular movement work?
The forearm lies on the desk and stays put, resting on the thick muscle in front of the elbow, and the push comes from the muscles above it. The hand rides on the curled ring and little fingers, which slide along the paper. The wrist and the side of the hand never touch the page.
Palmer called the arm the writing machine, and his first lessons teach a child to run it without a pen. Make a loose fist, rest the forearm on the desk, and slide the hand forward and back without bending the wrist or fingers. The sleeve stays where it is, and the movement happens inside it. That small push and pull drives every letter in the book.
To find where the arm belongs, Palmer had pupils lift the whole arm a few inches and let it drop. Wherever it landed was the spot.
The grip is light. The first finger lies on top of the penholder about an inch from the point, the thumb sits across from that finger's first joint, and nothing pinches. The other hand slides the paper along three or four times per line, so the writing arm never stretches. Palmer even wanted the right forearm free of heavy clothing, and wrote that many good writers cut the right undersleeve off at the elbow.
What are the Palmer Method drills?
The first two drills are the push-pull, a tight block of slanted straight lines, and the compact oval, a spiral of loops shaped like a big capital O. Each is two spaces tall on paper ruled 3/8 inch apart, so the drills stand about 3/4 inch high. Palmer's target for both was 200 downstrokes a minute, counted out loud.
The count matters as much as the shape. Pupils counted only the downstrokes, 1 to 9 and then 10, 1 to 9 and then 20, on up to 200, and the whole class moved to it. Palmer liked that it calmed fidgety writers and pulled slow ones along.
Too slow and the line comes out shaky, which in Palmer's book meant the drill had failed. Too fast and the shapes fall apart. The manual has a fix for each kind of bad oval:
- Too wide: the motion was too round, so add more of the push-pull.
- Too narrow: too much push-pull, so make the motion rounder.
- Leaning backward: the downstrokes were pulled toward the right elbow. Pull them toward the middle of the body instead.
- Leaning too far forward: the downstrokes went toward the left shoulder. Same fix.
Before each oval, pupils traced its path in the air and let the pen land while still moving, a running start that breaks the habit of drawing with the fingers. The manual brags about a twelve-year-old boy who made 3,000 ovals across a page 8 inches wide on one dip of ink.
Words come next, with speeds of their own. The first practice words are mine, uses and sell, at 18, 20 and 22 a minute. They use short letters only, so the drill movement carries straight into writing.
Did the Palmer Method work?
Partly. In 1918, Frank Freeman, an educational psychologist at the University of Chicago, filmed people writing and found that almost nobody writes with the arm alone. In every school system and grade he checked, only a small share of children used mainly arm movement. And good writers used their fingers as often as poor writers did.
Freeman's team recorded 50 children and 15 adults in the lab in close detail, then 273 public-school children in a broader check. His verdict on the arm-only rule was blunt. Trying to build it into every child doesn't succeed, he wrote, and children can form letters with whatever mix of finger and arm movement comes naturally.
But the drills weren't wasted. Public-school children trained in arm movement had better rhythm and pace than children at the university's own elementary school. Freeman decided rhythm was the real prize, and that you could teach it directly by writing to a count. He ran a course built on that idea in one public school for eight months. Against two other schools in the same city, the trial school made 37 percent more progress in speed and ten times as much progress in letter form.
Classrooms told the same story. Braden writes that many school systems never enforced Palmer strictly, because teachers lacked the training and teachers and pupils alike disliked the strict drill. Schools often mixed it with other methods.
Should you teach your child the Palmer Method?
Not the full program, for most families. The manual asks for weeks of drills before words, and it leaves left-handers out. Borrow the useful parts instead: the oval and push-pull warm-up, the light grip with the hand gliding on the little fingers, and writing to a count.
Age is the first filter. The 1915 teacher notes expect third, fourth and fifth year pupils to spend a full week on the first two drills. Modern programs start cursive around second or third grade, at 7 or 8, and a child is ready once they can print every lowercase letter from memory. A five-year-old who is still learning to print has no use for a timed oval. Braden's history names that problem, young children lacking the motor control for cursive, as one reason schools moved to print first.
Left-handed kids need a mirrored setup, not a different hand. Put the left forearm on the desk, turn the paper the other way, and pull the downstrokes toward the middle of the body. The rests and the count work the same, and our left-handed handwriting tips cover paper angle and grip.
And drop the arm-only rule. Freeman showed that good writers mix finger and arm movement, so moving fingers are normal. Watch the grip instead. If the fingertips are white from squeezing, it's too tight.
How to try Palmer drills at home
These steps suit a child of about 7 to 10 who prints well and has started cursive. Plan on two or three minutes of drills, the time Palmer gave ovals at the start of each lesson, then move on to letters.
- Sit back in the chair with feet flat and both forearms on the table. Do Palmer's arm drop: lift the writing arm a few inches, let it fall, and leave it where it lands.
- Use wide-ruled notebook paper. Its lines are 11/32 inch apart, about 8.7 mm, close to Palmer's 3/8 inch, so ovals two lines tall come out the right size. Turn the sheet so downstrokes pull toward the middle of the body.
- Run the writing machine for 30 seconds with no pencil: loose fist, forearm still, hand sliding forward and back.
- Make one block of push-pulls two lines tall, counting the downstrokes out loud to 10, then stop and look. You want a light line that doesn't wobble. Don't chase 200 a minute. Palmer warned that too much speed does as much harm as too little.
- Trace an oval in the air three times, let the pencil land while it's moving, and go around six times. Check it against Palmer's list: too wide, too narrow, or leaning back.
- Write one short cursive word your child knows, like mine or sell, five times in a row to a slow, even count.
- On day one, have your child write a sample sentence, date it, and put it away. Palmer asked every new pupil for this first specimen, and Freeman's trial course taught children to judge their own writing. Compare once a month.
Then put the drills away and write real words. Palmer was firm that ovals are worth nothing unless they lead to writing, and that a child who drills in good posture and then slumps over every other page never gets past the beginning.
The short version
The Palmer Method is the arm-driven, drill-first cursive that led American schools for about half a century. Its arm-only rule didn't survive Freeman's 1918 study, but the warm-ups, the light grip and the counted rhythm still work. Give your child two minutes of ovals and push-pulls, then move to letters. The cursive worksheets on TraceTots print the whole cursive alphabet on guided rows, so your child can trace a letter and then write it from memory on the same page.
Make a name tracing worksheet
Type a name, pick a font, and print a free tracing sheet to practise with.